Wiring ESP32-C with PoE
0:36
Below is a summary of the recommended interfacing approach:
-
RMII Data Connection:
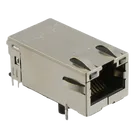
- Wire the RJ45 port—with its built-in magnetics—to the LAN8720’s differential signal pairs.
- Connect the LAN8720’s RMII TX (data out) and RX (data in) pins to the corresponding RMII pins on the ESP32-C.
- Tie the LAN8720’s CRS_DV (carrier sense/data valid) to the ESP32’s designated input.
- Ensure proper matching and impedance on these lines.
-
Reference Clock Configuration:
- The LAN8720 typically requires a 25 MHz reference clock.
- You can either use an external crystal oscillator for the LAN8720 or arrange for the ESP32 (if it supports it) to provide the clock.
- Verify that the chosen clock source is synchronized with the ESP32’s RMII interface.
-
Management Interface (MDIO/MDC):
- Connect the LAN8720’s MDIO and MDC pins to the ESP32’s corresponding management pins.
- This allows the ESP32 firmware to configure the LAN8720 at startup.
-
Power Supply via PoE Circuit:
- Use your PoE circuit to step down the incoming high voltage (usually 48 V) to the levels required by both the LAN8720 and the ESP32—typically 3.3 V or 5 V, depending on your power rail design.
- Make sure to include the appropriate decoupling capacitors and filtering as per the datasheet recommendations for each device.
- Ensure that both devices share a common ground provided by the PoE extraction circuit.
-
Additional Considerations:
- Double-check that the voltage levels and IO standards on both the LAN8720 and ESP32 match—if not, level shifters might be necessary.
- Follow the datasheets for recommended layout and decoupling practices to maintain signal integrity on high-speed Ethernet lines.
This interfacing strategy ensures that the RJ45 port provides proper isolation via the magnetics for both data and PoE, while the LAN8720 translates and routes the Ethernet signals to the ESP32 through a properly configured RMII bus.
Let me know if you’d like further details on any part of the configuration!
Ask about RMII buffering
Question on clock source
Decoupling capacitor recommendation
380 days
To get started, talk to Flux or create a New Document.


Welcome 👋
Flux accelerates your PCB design with AI.
Create your account to start using this component and bring your ideas to life.
