Treat Flux like your intern. Tell it what you'd like to build and it'll get to work. You can also ask it questions, brainstorm ideas, and teach it your preferences. Learn More
This project revolves around creating a connector for different models of the Raspberry Pi, specifically models 2, 3, 4, 5, and the 400 Model B+. Let's break down the various components and aspects of this project:
Key Components:
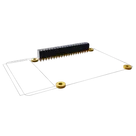
Raspberry Pi Connector: This project is set up for the Raspberry Pi models 2-5 and the 400 Model B+. It includes the connector pins that interface with the Raspberry Pi and outlines the board with appropriate mounting holes for physical integration.
Insulation Height: The insulation height mentioned is 0.335 inches (8.51 mm), which is typical for the clearance required when connecting to a Raspberry Pi.
Compatibility: The compatible part number is PPPC202LFBN-RC, which corresponds to connectors fitting these Raspberry Pi models.
Project Properties:
Designator Prefix: There's a designator prefix "RPi" which suggests naming convention for components designated for the Raspberry Pi connector.
Manufacturer Name: Seems to be a placeholder or a part of template data ("Manufacturer Name,: 1").
Project Components:
Pins: A total of 67 pin names: These likely correspond to the different GPIO pins and other interfaces available on the Raspberry Pi models.
Electrical Connections: No electrical connections have been made yet in this project, indicating it's either a template ready for modifications or a starting point for further schematics.
Usage:
This setup is designed to act as a blueprint or template for creating a Raspberry Pi Shield or HAT (Hardware Attached on Top). Shields extend the functionality of the Raspberry Pi by allowing additional components or modules to be stacked on top of the board.
If you have any specific questions about how to proceed with connections or functionality you want to incorporate, feel free to ask!
To connect multiple connectors like the Raspberry Pi connector in parallel, you would essentially be connecting the same pins of each connector to the same signals or nets. This is commonly done when you want multiple devices to receive the same inputs or share the same outputs.
Here's how you could set this up:
Steps to Connect Multiple Connectors in Parallel:
Identify Pins: Start by identifying which pins on the connector need to be connected in parallel. For a Raspberry Pi connector, you might want to connect the power, ground, and specific GPIO pins.
Create Nets: For each set of pins you want to connect in parallel, you will create a net. This is a pathway that connects the same signal across multiple connectors.
Connect Identical Pins: Connect the equivalent pins across all connectors:
Power Pins: Connect all +5V/GND pins in parallel.
GPIO Pins: Connect the same GPIO pins in parallel if they are meant to receive the same signals.
Here's an example of how connections might look for two Raspberry Pi connectors in parallel:
Connect Connector1:P1 to Connector2:P1 for +5V.
Connect Connector1:P6 to Connector2:P6 for GND.
Connect other corresponding GPIO pins as needed:
Connect Connector1:P3 to Connector2:P3 for GPIO2.
Connect Connector1:P5 to Connector2:P5 for GPIO3.
Considerations:
Signal Integrity: Make sure the devices connected to these signals can tolerate the shared lines without causing issues. Ensure the total load on the GPIO pins is within limits.
Power Supply: Ensure that your power supply can handle the combined current requirements of all devices connected in parallel.
Addressing/Identification: If the connected devices require unique identification or addressing, make adjustments accordingly (e.g., I2C devices should have unique addresses).
Would you like any specific connections drawn up or more details on a specific part of the setup?
This project appears to be a hardware design for a Raspberry Pi Shield, which connects to a Raspberry Pi Model B (including versions 2, 3, 4, 5, or 400). Here's a detailed breakdown of the project:
Project Summary
Focus: Designing a connector for Raspberry Pi Shields.
Target Models: Raspberry Pi Models B (2, 3, 4, 5, and 400).
Purpose: The connector would be used to interface with Raspberry Pi boards, serving a common foundation for custom shields that can be attached to these models.
Project Components
Connector Pins: There are a series of pins labeled from P1 to P67. These pins likely correspond to the GPIO (General Purpose Input/Output) pins and other connectors on a Raspberry Pi.
Designator Prefix: The designator prefix for this project is labeled as RPi: 0.
Additional Details
Compatible Part Number: The part is compatible with the PPPC202LFBN-RC connector, a common part used for Raspberry Pi headers/shields.
Insulation Height: 0.335 inches $8.51$ mm, which specifies the height for insulation - crucial for ensuring physical fit, especially if stacked or integrated within larger systems.
Current State
There are no electrical connections made yet. This suggests that the initial task might involve mapping the Raspberry Pi pins from the schematic into practical electrical connections based on the project's requirements.
Do you want any specific guidance or suggestions on what part of the project you'd like to work on next?
1y
1
No files yet
Reviews
Documents
Documents are markdown text files which describe project goals, capture details, or even simulation outputs.
Assets

Raspberry_Pi_2_3-Symbol with text.svg
Raspberry_Pi_2_3-Symbol with textDefault
raspberry-pi-4-model-b-2gb-ram.jpg
raspberry-pi-4-model-b-2gb-ram
Raspberry Pi 2 3 4 5 Model B-removebg-preview.png
Raspberry Pi 2 3 4 5 Model B-removebg-previewThumbnail
Raspberry Pi 2, 3, 4, 5 or 400 Model B+ connector with RPi board outline and mounting holes. good for Raspberry Pi Shield projects. Insulation Height
0.335" (8.51mm) Compatible part number: PPPC202LFBN-RC #Raspberry_Pi#Shield#RPi#template#part
Properties
Connector
RPi
Pricing & Availability
Distributor
Qty 1
Controls
Welcome 👋
Flux helps you build PCBs faster with an AI teammate!
Create your account to collaborate, stay updated, fork your own version, and get instant answers from our AI agent.
kraxgm01
copilot
-
Raspberry Pi Connector: This project is set up for the Raspberry Pi models 2-5 and the 400 Model B+. It includes the connector pins that interface with the Raspberry Pi and outlines the board with appropriate mounting holes for physical integration.
-
Insulation Height: The insulation height mentioned is 0.335 inches (8.51 mm), which is typical for the clearance required when connecting to a Raspberry Pi.
-
Compatibility: The compatible part number is PPPC202LFBN-RC, which corresponds to connectors fitting these Raspberry Pi models.
Project Properties:-
Designator Prefix: There's a designator prefix "RPi" which suggests naming convention for components designated for the Raspberry Pi connector.
-
Manufacturer Name: Seems to be a placeholder or a part of template data ("Manufacturer Name,: 1").
Project Components:-
Pins: A total of 67 pin names: These likely correspond to the different GPIO pins and other interfaces available on the Raspberry Pi models.
-
Electrical Connections: No electrical connections have been made yet in this project, indicating it's either a template ready for modifications or a starting point for further schematics.
Usage:kraxgm01
copilot
- Connect Connector1:P1 to Connector2:P1 for +5V.
- Connect Connector1:P6 to Connector2:P6 for GND.
- Connect other corresponding GPIO pins as needed:
- Connect Connector1:P3 to Connector2:P3 for GPIO2.
- Connect Connector1:P5 to Connector2:P5 for GPIO3.
Considerations: