ESP32-C3 Board Design
0:00
Work done
- Project description updated with #ESP32C3 #SuperMini #LowProfile #CompactDesign
- System Architecture property updated to SuperMini mermaid diagram
- Removed ESP32-C3-MINI-1 (U1) and placed ESP32-C3 SuperMini (U1)
- Connected U1 VIN to +5V, U1 VDD to 3V3, all U1 ground pins to GND
- Mapped peripherals:
- Added 330 Ω resistor (R3) in NeoPixel data line
Tasks left
- Add 10 µF bulk capacitor at the TPS62130 3.3 V output
Success criteria
- ✅ ESP32-C3 SuperMini replaced and all peripheral nets preserved
- ❌ Bulk decoupling capacitor not yet added
Next step
Add the 10 µF bulk capacitor (0603) at the TPS62130 output and rerun ERC checks to verify decoupling.
167 days
0:46
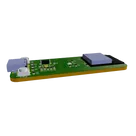
Looking for "Identify the exact product shown on this page. Is it an ESP32-C3 SuperMini development board/module? Extract the product name, key description, any pinout or dimensions, and whether it matches a compact ESP32-C3 SuperMini board for replacing an ESP32-C3-MINI-1 module in a custom design." in 3013220.html
Probably yes, that is the right product family for an ESP32-C3 SuperMini, but I could not directly verify that exact LCSC wrapper page content from the link you sent because the page did not expose readable product text to my extractor.
The important part is this:
- An ESP32-C3 SuperMini is a small development board
- An ESP32-C3-MINI-1 is an Espressif RF module
- So the ESP32-C3 SuperMini is not a drop-in replacement for an ESP32-C3-MINI-1
For your project, that means:
- If you want to build a board that contains a tiny ready-made controller board, then ESP32-C3 SuperMini is fine
- If you want a cleaner/custom production PCB, then using the bare ESP32-C3-MINI-1 module is usually the better approach
If you want, send me the actual part number / product title / screenshot from that page, and I can tell you immediately whether it is the exact ESP32-C3 SuperMini variant you want.
Find exact part
Check pinout match
Use bare module instead
19 days


Welcome 👋
Flux accelerates your PCB design with AI.
Create your account to start using this component and bring your ideas to life.
sriramt384
copilot